
Sunday, May 15, 2011
Gluten-free, Vegetarian, dairy-free, Recipe Resource
I want to tell you about a gluten-free, dairy-free, vegetarian, resource, with dozens of excellent looking recipes. If you are looking for a particular type of recipe, this list might have it for it. Karina, at the Gluten-free Goddess, has been gluten-free since 2001, and has even written a cookbook. You may find you have a different religious point of view then she does; if that is true, scroll past the chatter, and go straight to the recipe.

Saturday, April 16, 2011
Farmhouse Seed Bread
In one of the blogs I read regularly, I just found a new bread recipe that appears to meet all the expectations I have in a recipe. And it has beautiful photos too. I haven't tried it yet, but I definitely will, maybe even tomorrow. And I'll let you know how it turns out. But just in case you need the recipe right now, I'll give you the link today. You can find it at Nourishing Meals' Blog. Be sure to comment if you try it, on this blog and at Nourishing Meals also. It is called Farmhouse Seed Bread. It is Xanthum free, soy free, flax free, nut free, and vegan.
Friday, February 25, 2011
Gluten-free, Vegan Carrot Muffins
 |
| This muffin fresh from the oven won't last long. |
 |
| It's going to go fast. |
 |
| One bite left . . . gone. |
Friday, February 11, 2011
Gluten-free, Vegan Carrot Orange Cake, With Coconut Orange Frosting
 | |||
| Grandma says the cake tasted "really good!" |
We needed a birthday cake in our family last week, and I got to be the one to bake it. Gluten free baking is not easy, so I avoid it when possible. But it wasn't possible this time. This cake had to be what my family calls, "everything free", and still taste good to the extended family with no known food limitations. But since it wasn't for my husband, it didn't really make it "everything free", and included more oil and sugar then normal. I decided that carrot cake would be a good risk. I looked at a lot of recipes on line, gathered some ideas, and then crafted my own recipe.
I think it turned out pretty good. It was delicate in texture, as many gluten free baked goods are, but it had a nice texture.
To see what the cake looks like as muffins, without frosting, or to get a few ideas on how to turn this cake recipe into muffins or cupcakes, go to this page.
Gluten-free Vegan Carrot-Orange Cake
(Soy-free, corn-free, nut-free, and pineapple-free, too)
By Barbara at wildflowermorningrecipes.blogspot.com
1 cup rice milk (or other milk)
3 T Ener-G Egg Replacer
1 cup rice flour
1 cup Bob's Red Mill Gluten Free flour mix, (or a mixture of garbonzo flour, and potato starch)
1/2 cup sorghum flour
1/2 cup coconut flour (grind up in your grinder or Vita-Mix)
1/4 cup ground chia seeds (or flax seeds)
2 tsp baking soda
2 tsp baking powder
2 tsp ground cinnamon
1 tsp ground ginger
1/2 tsp salt
3/4 cup turbinado sugar (or other sugar)
3 cups grated carrots
3/4 cup oil
3/4 cup orange, peeled, and blended (about 1 orange)
1. Set the oven to 350 degrees. Grease two 8" round cake pans with palm shortening or some other kind of oil, and then dust with rice flour, pouring off the excess.
2. In a medium bowl, mix the rice milk and Egg Replacer and set aside.
3. In a large bowl, mix the dry ingredients, starting with the rice flour, and moving down to the turbinado sugar. Mix thoroughly. Add the grated carrots and mix.
4. In the medium bowl in step number 2, add the blended orange, and oil, and mix. Add these wet ingredients to the dry ingredients in step number 3, and mix until all the dry ingredients are incorporated into the wet ingredients, but don't over mix.
5. Pour the batter into the two prepared cake pans and slip into the oven. Bake 35 - 40 minutes. Remove from oven, and cool in the pans. This is a delicate, but flavorful cake. Don't remove them from the pans until they are cool and you are ready to frost it. It will frost easier if you freeze the cake layers first. Then lay a flat plate on top of the cake pan, and carefully flip the cake over, and slide onto your cake serving tray. Spread frosting on top of that layer. Then put the plate onto the second cake, carefully flip it onto the plate, and then gently slide it onto the frosted bottom layer. Then frost the whole cake.
Coconut Orange Frosting
By Barbara at wildflowermorningrecipes@blogspot.com
3/4 cup of the thickest part of a can of coconut milk (If there isn't a thick layer, set it in the refrigerator for a couple hours until it separates)
1 cup palm shortening (non-hydrogenated)
1/2 to 1 tsp vanilla (gluten free if needed)
1/2 to 1 tsp orange oil or flavoring (adjust amount to desired taste)
2 or more cups of powdered sugar (not all kinds are gluten free)
Place all ingredients, except the powdered sugar into a mixer bowl, or into a food processor. Mix until very smooth. Add powdered sugar, add more if needed for taste or texture.
Garbanzo Olive Dip
We have a new dip that we are making at home, and Grandma says we have to make it again. So I'm sharing the recipe with you, so I can remember what I put in it too. We used it for dipping some new chips made out of just popcorn and sea salt, but of course they would be good for other chips too, and as a nice spread for some rice cakes, corn thins, or of course a sandwich with homemade bread.

Garbanzo Olive Dip
By Barbara at wildflowermorningrecipes@blogspot.com
2 cans of garbonzos, drained (14 oz. cans)
2 cloves garlic, peeled and chopped or pressed
1/8 of an onion, more or less
1/4 cup tahini
1 medium tomato, or a large handful of cherry tomatoes
juice of one lemon
1/2 - 1 tsp ground cumin
1/2 tsp garlic powder
1 tsp onion powder
salt, if desired
1 can of olives, drained (ripes green ones are especially delicious)
Dump everything into the food processor, except the olives, and process with the sharp S-Blade until everything is ground down and moving easy. Dump in the olives, and process until they are chopped up in little pieces you can still see, but avoid grinding them down to nothing, unless you prefer that texture. Serve.
If you don't have a food processor, here is an idea to do it in a basic blender.
First, pre-mash your garbanzos a bit with a fork. Put them in the blender with the tomato cut in chunks, and the lemon juice. Blend, and scrape, until you have it at a more dip like consistency. Scrape it out into a bowl, and then add ingredients. Instead of using raw onion and garlic, mix in more onion and garlic powder. Use chopped olives instead of pitted olives. Mix everything together and then start dipping, spread in your sandwich, or on your Corn Thins.
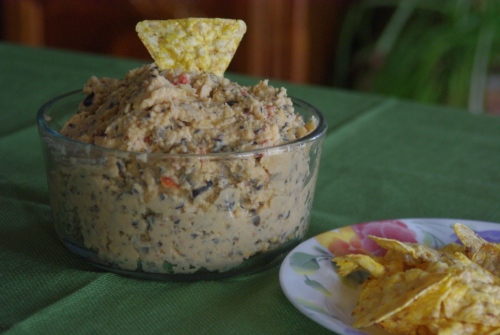
Garbanzo Olive Dip
By Barbara at wildflowermorningrecipes@blogspot.com
2 cans of garbonzos, drained (14 oz. cans)
2 cloves garlic, peeled and chopped or pressed
1/8 of an onion, more or less
1/4 cup tahini
1 medium tomato, or a large handful of cherry tomatoes
juice of one lemon
1/2 - 1 tsp ground cumin
1/2 tsp garlic powder
1 tsp onion powder
salt, if desired
1 can of olives, drained (ripes green ones are especially delicious)
Dump everything into the food processor, except the olives, and process with the sharp S-Blade until everything is ground down and moving easy. Dump in the olives, and process until they are chopped up in little pieces you can still see, but avoid grinding them down to nothing, unless you prefer that texture. Serve.
If you don't have a food processor, here is an idea to do it in a basic blender.
First, pre-mash your garbanzos a bit with a fork. Put them in the blender with the tomato cut in chunks, and the lemon juice. Blend, and scrape, until you have it at a more dip like consistency. Scrape it out into a bowl, and then add ingredients. Instead of using raw onion and garlic, mix in more onion and garlic powder. Use chopped olives instead of pitted olives. Mix everything together and then start dipping, spread in your sandwich, or on your Corn Thins.
Monday, October 25, 2010
Barbara's Gluten-free (Almost Whole Wheat) Bread
 | |||
| Fresh Gluten-free Bread, Ready to Bake |

I grew up eating homemade whole wheat bread. Every morning it seemed we ate homemade whole wheat toast. Every day at school I devoured sandwiches made from homemade whole wheat bread. Even at a young age, when my mom was there, I was there with her in the kitchen mixing yeast and sugar, wiping flour on my face, kneading my little bit of dough while she kneaded 6 loaves of dough at a time. I learned a lot from mom, one of which was that Whole Wheat Bread is a life essential and that it tastes best when you make it from scratch. I came to enjoy making bread on my own. When I went away from home and got my own kitchen, I started making bread for myself. I would still make 6 loaves at a time, which is a huge amount for one person, but I'd put them in the freezer, and then they'd be ready when I needed them. I didn't need to make bread too often.
What I didn't know was all that wheat bread eating was causing my health problems. It was good whole wheat bread, but it wasn't good for me. I was over weight, had a cloudy head and was tired all the time. Since then I have learned that I am gluten intolerant. Living gluten free has changed my life. Among other things, I have energy. I don't need naps all the time. My head is so much more clear. And it is easy for me to maintain a healthy weight. I have learned to be happy without eating bread. (I really was addicted to it.) It has been around 13 years since I first went gluten free, but in all this time, I have not found a bread that starts to compare to the bread I used to make. But I've developed a recipe that comes closer then anything else I've tasted. And I give thanks to God for making it happen. All good ideas come from God.
I've learned that there are lots of different kinds of breads out there. There are lots of ideas on what the perfect bread tastes like. Only a few people enjoy a vegan whole wheat bread when they are eating gluten, so I can tell you from the start, this bread recipe will be only for a certain group of people who want a plant based bread, containing as many whole grains as possible, with no eggs, milk or refined fats. This bread will surprise many people because it contains an apple and a stalk of celery, but those two ingredients are very important to the success of the bread, so don't leave them out. The recipe requires a high quality blender, so if you don't have one, this recipe isn't for you. But if your desires are similar to mine, I think you will find this bread to be very pleasing. It rises well compared to other whole grain gluten-free bread recipes I have tried. And the best of all, this recipe has excellent flavor for a whole grain, plant-based, gluten free bread. It has been a long time since I've eaten Mom's homemade bread, but this bread gets closer to it then any I've tasted, given my other dietary restrictions.
Go ahead and give it a try. Follow the directions carefully. I've learned that many of Mom's rules for making whole wheat bread don't apply here.
 |
| Newly Shaped Loaf |
Barbara's Gluten Free (Almost Whole Wheat) Bread
By Barbara @ wildflowermorningrecipes.blogspot.com
January 2012 Edition
Step 1: First of all, if you keep your yeast in the freezer, get it out early and measure it so it will be room temperature by the time you are ready to add the sweetner and liquid. Then make some flour mix. You will use part or all of the flour mix to make the bread. You could make a large amount of flour mix ahead of time and keep it in the freezer, but make sure it is at room temperature before you mix up the bread.
Flour mix:
2 cups gluten free oat flour (grind in your blender from gluten free oats)
1 cup teff flour
2 cups sorghum flour
½ cup garbonzo or garfava flour
1 ½ cup tapicoa flour/starch
1/4 cup psyllium seed husks
2 Tbsp. EnerG egg replacer
1 Tbsp. xanthan gum
Step 2: In quart sized bowl mix together:
1/2 tsp. honey
1 cup very warm, almost too-hot water
1 Tbsp. yeast
Let set 'til foamy
Step 3: In blender combine:
1 fuji apple, medium to small in size, cored and sliced
2 large stalks of celery
¾ cup walnuts
1 cup flax seeds
1 tsp. rose hip powder (If you don't have this, You can sub 1-2 Tbsp. lemon juice, but the rose hip powder yields a little better result. This is to put an acid in the recipe.)
1 cup flax seeds
1 tsp. rose hip powder (If you don't have this, You can sub 1-2 Tbsp. lemon juice, but the rose hip powder yields a little better result. This is to put an acid in the recipe.)
3 tsp salt
2 tsp. blackstrap molasses
3 cups warm water
Blend until thick and foamy. Then add to yeast mixture, when the yeast is ready.
2 tsp. blackstrap molasses
3 cups warm water
Blend until thick and foamy. Then add to yeast mixture, when the yeast is ready.
Step 4: (The first thing I need to remind you of is that this is not wheat bread, and therefore you will not follow the rules for making wheat bread.) When the yeast mixture is good and foamy, place the ingredients in the blender and the yeast mixture in large bowl and mix well with a whisk or wooden spoon. Now add 2 cups of the flour mixture made in step 1 (above). Mix until well combined, but don't over mix. Add more flour mix, cup by cup, stirring well, until dough is dry enough to knead on the counter (probably about 2 -3 cups of flour mix), but still sticky. You may not need all the flour mix for one recipe. Scrape the dough out onto the flour covered counter and then spread some flour on top of the bread. Gently work the bread, turning it under and around. Do not work it hard like wheat bread. Work in just enough flour so you can handle it and shape it into loaves. Your hands will still be sticky. This is one of the major secrets of this bread, put in just enough flour to form loaves and work it in completely, but don't over work it, but do not work in too much flour, or over work the dough, or it will be heavy bread. Remember you are not working to activate gluten fibers in the bread, as there is none, but rather to just mix the bread well. It really does not take too long to do this.
Step 5: Shape into two loaves, and placed in oiled bread pans. Cover and let rise for 30 minutes. 
Step 6: Place bread on a low rack in a cold oven set for 350 degrees Fahrenheit. Bake for 90 – 100 minutes.
 |
| Cool and Ready to Slice |

Step 7: After the bread is baked, let it cool. It is quite sticky at first, but will be more firm the next day. It is best to keep it in the refrigerator. If you aren't going to eat it right away, slice the bread and then store it in a zip bag in the freezer, taking out only as much as you need at a time, and letting it thaw to make sandwiches, or toasting it in a gluten free toaster, (so as to avoid contamination from gluten crumbs).


Thursday, August 12, 2010
Home Dehydrated Veggies for Backpacking

As gluten-free vegans, vegetables are our main food of choice when eating at home. When we are backpacking, we want to eat vegetables too. It is easy to buy dehydrated fruit, but vegetables aren't as easy, unless you buy the very expensive freeze dried kind. So, I set my mind to figure out how it can be done. And my idea worked brilliantly.
I'll teach you how to make dehydrated broccoli and dehydrated peas and carrots in this post. In another post I'll teach you how to make fabulous dehydrated green beans and sunflower seeds. Home dehydrated corn does not work well, so if you need corn, go ahead and buy the freeze dried kind.
Dehydrated broccoli
Buy bags of frozen broccoli. Get the kind that is already chopped small. You don't want bags of frozen stems, if you can help it.
You can open a bag and sprinkle it on the try, just as it is and dehydrate it, if you will be putting it in something that needs to be boiled just a little while.
If you want something that cooks up real fast, or you can put in a "just add hot water soup", or put in a seasoning mix, you need broccoli that is even smaller. Easy. When the broccoli is still frozen solid, open the bag and put it in a food processor. Process until it is as small as the processor makes it, or as small as you desire it. Then spread it on dehydrator trays and dehydrate until dry. It is a fabulous dehydrated vegetable and rehydrates quickly, with good flavor.
Use the larger dehydrated broccoli pieces in quinoa pilaf. Use the smaller pieces in Asian Noodles, Black bean soup, or in other instant soup mixes or seasonings.

Peas and Carrots
Use the same method for peas and/or carrots. I buy the frozen bags of mixed peas and carrots. The more veggies I can get, the better. While they are still frozen solid, place them in a food processor and whiz them around until they are as small as the processor can make them. Spread the little pieces on dehydrator trays and dry until they are completely dry. Seal them in ziplock bags. In camp pour boiling water over them and they rehydrate in just a couple minutes with nice flavor.
Use them in the Asian Noodle veggie mix with broccoli, add them to your black bean soup mix with broccoli and tomatoes for more nutrition and flavor. Put them in any thing else your mind dreams up. Let me know what you come up with.
Gluten-free Vegan Asian Noodles for Backpacking
The traditional noodle for backpacking is Ramen, but they don't work if you are gluten intolerant or a celiac. There are some pre-packaged asian soup mixes available that are gluten free, but more likely then not they contain shrimp, or MSG. Here is my answer to the need for easy backpacking noodles, that are almost as fast as Ramen, but much more delicious and nutritious.
Asian Noodles or Pancit
1. In the Asian Section of the store buy some glass noodles, or Vermicelli made from mung beans or peas. They are clear, very thin noodles.
2. Dehydrate some vegetables at home for your noodles. I used dehydrated frozen broccoli, and peas and carrots. (Directions on this page.) Be generous with the veggies. This is the nutrition of your soup.
3. Make a Seasoning Mix from:
- gluten free vegan chicken-like seasoning (I use La Chikky by The Vegetarian Express)
- onion powder
- garlic powder
- salt
- any other flavor you desire
Make your own mix. Be generous with the veggies. The are the nutrition in this mix. There really isn't much in the noodles. Then put in chicken-like seasoning, onion powder, garlic powder and salt, according to how flavorful you like it. You might want to experiment at home with this one too, to see how much you need.
In camp, put your noodles in the pot, and just cover with water. Pour in your generous amount of veggies and seasoning mix to taste. Bring to a boil, and start trying to stir. The noodles soften quickly soon after the water boils. They will absorb most of the water. Once the noodles are soft, you can eat.
Asian Noodles or Pancit
1. In the Asian Section of the store buy some glass noodles, or Vermicelli made from mung beans or peas. They are clear, very thin noodles.
2. Dehydrate some vegetables at home for your noodles. I used dehydrated frozen broccoli, and peas and carrots. (Directions on this page.) Be generous with the veggies. This is the nutrition of your soup.
3. Make a Seasoning Mix from:
- gluten free vegan chicken-like seasoning (I use La Chikky by The Vegetarian Express)
- onion powder
- garlic powder
- salt
- any other flavor you desire
Make your own mix. Be generous with the veggies. The are the nutrition in this mix. There really isn't much in the noodles. Then put in chicken-like seasoning, onion powder, garlic powder and salt, according to how flavorful you like it. You might want to experiment at home with this one too, to see how much you need.
In camp, put your noodles in the pot, and just cover with water. Pour in your generous amount of veggies and seasoning mix to taste. Bring to a boil, and start trying to stir. The noodles soften quickly soon after the water boils. They will absorb most of the water. Once the noodles are soft, you can eat.
Gluten-free Vegan Soup Mixes for Backpacking

The basic idea is that you make a soup that you like to eat at home, and dehydrate it.
Below you will find directions for three easy homemade soups for backpacking that are gluten-free, vegan, and MSG free.
Split Pea Soup
The easiest soup to make, dehydrate, and rehydrate is split pea soup. Cook up a pot of your favorite flavor of split pea soup. Make sure it is flavored well. Then spread it thinly on your dehydrator sheets, like you would fruit leather. It will separate and crumble as it dries, and by the time it is done, it will be more powdery then not. At this stage, powder it further in a food processor if you wish, and then put it in ziplock bags, either in one person portions, or in a larger bag for a family.
In camp, boil some water. Put your soup powder in your cup, and pour boiling water over the top. It is ready to eat in just a few minutes of soaking.
Thai Curry or Other Soups
These soups usually aren't instant, but it doesn't take long to cook them up in a pot of boiling water. I have a great recipe for Butternut Squash Curry on my blog if you need one. When you cut up the vegetables for your curry, cut the pieces small. Potatoes work best if they are cut in thin slices. Make the curry like normal. Once cooked soft, spread it on dehydrator trays. Dehydrate until completely dry. Put it in the food processor to make the pieces even smaller. Guess at the amount you will need per meal and seal in a ziplock bag.
In camp, guess at how much water you will need. Mix in your dehydrated curry mix. Bring the water to a boil, stirring as needed. Simmer until the soup is soft enough to eat. Enjoy gourmet food in the wilderness.

Black Bean Soup
In the bulk section of our grocery store, there are dehdrated pinto bean flakes, and black bean flakes. These are great for backpackers who eat simply.
Buy some black bean flakes
Add:
- dehydrated veggies (I used dehydrated broccoli, peas and carrots, ground up sun dried tomatoes are nice too) (pictured at the top of the page; directions on this page)
- dehydrated onion
- garlic powder
- chili powder
- cumin
- salt
Make a sample of the soup at home to check your seasoning levels. Boil some water. Put a little of your soup mix in a bowl, pour on some water, stir, wait until soft and then eat a spoonful. Add more of what ever flavor it is missing. If you like spicy food, make it spicy. If your seasoning is too strong, add more black beans. Once you have it good. Divide it into servings and put in little ziplocks.
In camp, put your mix in a cup, add boiling water, stir, and eat when soft. It won't take long.
Wednesday, August 11, 2010
Gluten-free Vegan Backpacking Food
 |
| View from Kintla Lake Backcountry Campground, Glacier National Park. |
I went to my nearest grocery stores to see what I could find, and the results were discouraging. I started reading labels, and decided it was time to dehydrate my own food. It was time to go gourmet. We were going to have the best gluten-free, vegan backpacking food on the Kintla Lake Trail in Glacier National Park.
Ramen isn't gluten-free, but there are some noodles that are. They are tiny clear noodles in the Asian food section. Sometimes they are called Glass Noodles, sometimes vermicelli. My favorite is made out of mung beans, but there are others made out of rice. With these noodles I made a quick and easy dish that reminds me of the dish from the Philippines called Pancit. I simply call them Asian Noodles. Make your own soup seasoning mix to go with it, or anything else you want to add flavor to or lots of home dehydrated veggies.
Dehydrated green beans sound unusual, but after eating them, you will want more. They are quite versatile, good as a dry veggie snack, or in cooked food.
Dehydrate your own potato slices, and make your own potato dishes.
Quinoa is good for breakfast or supper.
 |
| Soup or Pancakes? |
Dehydrated spaghetti sauce and walnut cheese sprinkles, and your favorite noodles.
Black bean soup, using the dehydrated black bean flakes in the bulk section of the grocery store. I also make easy dehydrated Split Pea Soup that will save a lot of money when you make it yourself and dehydrates faster then anything else.
You can make most any other favorite soup you like to eat at home and dehydrate it too. I like to make dehydrated Thai Curry.
Homemade granola for lunch. Yes, for lunch. It is crazy sounding, but works for us. We have time in camp to make a full meal for breakfast. But lunch is on the trail, and pre-made granola bars don't work for us. So why not put your granola bar in a bowl with some milk powder, pour on some water and enjoy. Supplement with some dried fruit, and nuts if you are still hungry. I also take some dehydrated kale chips, flax crackers, and such, but granola is the main deal. It's best feature is that it is simple, and fast. No thought needed and little prep time needed in the middle of the day. You are back on the trail quickly.
And the most popular food item of the whole trip, Back Country Burritos. It takes some prep work ahead of time, but it was absolutely delicious in camp.
So here's the deal. I'll give you detailed instructions in additional posts and link from this post to them. So get your dehydrator ready. There is still plenty of time for backpacking before the snow flies.
 |
| The only bear we saw on the trail hung out in this backpack. He knew where to find good food. |
Subscribe to:
Posts (Atom)